Learn Rough Sketching
I wanted step-by-step instructions for how to learn to draw or draw better. I wanted to start with the basics quite quickly and the aim is just be good at rough or very rough sketching both for diagrams and for figures of people.
Goal
Get to “useful rough sketching” (diagrams, thinking visuals) fast by training: (1) simple forms, (2) clean lines, (3) clear structure, (4) legible text + layout.
Setup
- Tools: one pen (fineliner) + cheap paper, or iPad + one brush. Avoid erasing early; it slows learning.
- Daily dose: 15–25 min, 5 days/week.
- Rule: draw larger than feels natural (big shapes improve control and clarity).
Week 1: Line control and basic forms
Day 1–2: lines and ellipses (10–15 min)
- Fill a page with straight lines: draw from shoulder, not wrist; ghost the motion once, then commit.
- Fill a page with C-curves and S-curves.
- Fill a page with ellipses (like “0” shapes) inside imaginary boxes; aim for smooth, not perfect.


Day 3–4: boxes and cylinders (15–20 min)
- Draw 20 boxes: each box gets 2–3 visible faces. Don’t shade; just edges.
- Draw 20 cylinders: two ellipses connected by sides. Keep the ellipses aligned.

Day 5: combine (20 min)
- Draw 10 “objects” built from primitives: e.g., mug = cylinder + handle; book = box; bottle = cylinder + cone.

What “good” looks like this week: fewer wobbly lines, boxes that read as 3D, ellipses that look intentional.
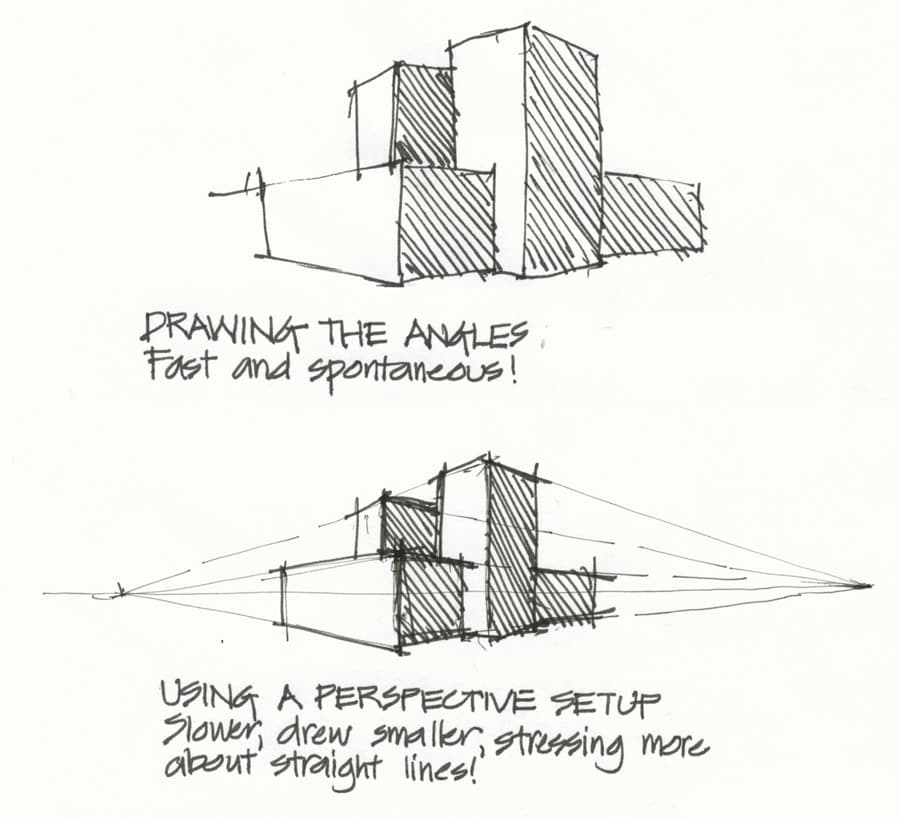
Week 2: Perspective you actually need for diagrams
Day 1–2: one-point “diagram perspective” (20 min)
- Draw a horizon line and one vanishing point (VP).
- Draw 10 boxes whose depth edges go to the VP.
- Make 3 simple “room” diagrams: floor rectangle to VP; add a table (box) and a screen (box).

Day 3–4: two-point basics (20 min)
- Put two VPs far apart (edges of page).
- Draw 10 boxes where left edges aim to left VP, right edges to right VP, verticals stay vertical.


Day 5: diagram scenes (20 min)
- Draw 5 “UI / system” panels as boxes in perspective (very light perspective, heavy clarity).
Week 3: Visual vocabulary for diagrams
You want a small “shape language” you can deploy instantly.
Practice set (repeat daily, 15–20 min)
- Containers: rectangles with titles, cards, swimlanes.
- Arrows: straight, curved, dashed; arrowheads consistent.
- Nodes: circles, rounded rectangles, icons (database cylinder, cloud, person).
- Emphasis: callouts, brackets, highlights, numbering.


Layout rule set (apply every time)
- One idea per frame.
- Align things; use a simple grid.
- Vary stroke weight: thicker for primary shapes, thinner for secondary/internal lines.
- Text first or early: label as you go; diagrams fail mostly from missing labels.
Week 4: From “rough” to “readable”
Daily drill (20–25 min)
-
Pick one concept you explained recently (work or life).
-
Draw it as:
- a flow (boxes + arrows),
- a hierarchy (tree),
- a two-axis map (quadrant),
- a loop (cycle).
-
Redraw the best version once, focusing only on spacing, alignment, and labels.


The two highest-leverage micro-skills
- Confident stroke
- Ghost → commit. One line beats five scratches.
- If a line is wrong, leave it and draw the right line once; the brain learns faster.
- Shape-first construction
- Everything is box/cylinder/sphere/cone first; details last.
- For any object: block-in primitives → refine silhouette → add 1–2 details only.
A simple “diagram sketching” checklist
Before you stop:
- Can someone unfamiliar tell what the boxes are and what the arrows mean?
- Are labels readable at a glance?
- Is there a visual hierarchy (big → medium → small)?
- Is spacing even enough to prevent clutter?
10m daily drill
10-minute daily drill (diagram sketching only)

Minute 0–2: Line warm-up
- Fill half a page with straight lines (horizontal, vertical, diagonal).
- Fill the other half with quick ellipses. Outcome: lines feel committed, not scratchy.
Minute 2–4: Boxes
- Draw 6–8 boxes (two or three faces visible).
- Keep verticals vertical; depth edges lightly converge. Outcome: boxes read instantly as containers.
Minute 4–6: Containers + labels
- Draw 2–3 large rectangles.
- Add title text at the top of each.
- Subdivide one container into 2–4 smaller boxes. Outcome: clear hierarchy before arrows.
Minute 6–8: Relationships
- Connect boxes with arrows.
- Use only one arrow type unless meaning differs.
- Add 1–2 short labels on arrows if needed. Outcome: flow is readable without explanation.
Minute 8–10: One full diagram
- Redraw the same diagram once, cleaner.
- Improve spacing, alignment, and text.
- Stop before adding detail. Outcome: one legible, communicable diagram.
Non-negotiable rules
- One stroke per line; no erasing.
- Draw large.
- Text early.
- Stop at “clear,” not “pretty.”
Colophon
https://chatgpt.com/share/695c84b8-2430-800a-88d5-64ffae8fd958